Setting up a Clan machine using PXE boot

I seem to always lose my USB drives when I need to make a live USB. Recently I needed one to install Clan on my Beelink Mini S12 Pro. [1]
Clan is a peer-to-peer computer management framework for NixOS. It lets you fully provision a remote machine in a declarative way. So, if Clan can control a machine over the network, why not just initially boot the machine over the network too? Then I wouldn't need to go out and buy a new flash drive.
This is where Preboot Execution Environment (PXE) boot saves the day. You run a PXE server on one machine that will serve up an image to boot. The client machine does a little autodiscovery, downloads the image and boots into it.
In my case, I used pixiecore to chain load NixOS and then installed Clan from that. The catch is that Clan uses SSH to connect to a remote machine and a stock NixOS image will not have the SSH public key for the machine that will configure it. So I did the following:
- Set up a Clan project to manage machines.
- Baked the SSH public key into the image that pixiecore served.
- PXE booted the machine.
- Installed Clan.
Initializing the Clan devshell
Before I set up the pixiecore image I configured the Clan project. That way I could add the PXE server to the devshell.
I started by following the quick start guide until I got to the Create Installer USB section. Note that I am on NixOS and already have direnv installed.
That gave me a folder with the following:
clan.nix- Where Clan stores the list of machines.flake.nix- Sets up the devshell with the Clan cli..envrc- Hasuse flaketo activate the devshell.
By default the generated clan.nix will contain:
      roles.server.settings.authorizedKeys = {
        # Insert the public key that you want to use for SSH access.
        # All keys will have ssh access to all machines ("tags.all" means 'all machines').
        # Alternatively set 'users.users.root.openssh.authorizedKeys.keys' in each machine
        "admin-machine-1" = "PASTE_YOUR_KEY_HERE";
      };
    };
Instead of setting the authorized keys in the clan.nix file, I created an authorized-keys.nix file:
{
  admin-machine-1 = "PASTE_YOUR_KEY_HERE";
}
Then I imported that into clan.nix:
roles.server.settings.authorizedKeys = import ./authorized-keys.nix;
Enhancing the Clan devshell with a PXE server
The wiki page for netboot has an example system.nix for booting NixOS using pixiecore. I used that as a starting point but made some modifications to it:
- Instead of a pinned nixpkgs with
getFlake, I used the input nixpkgs from the Clanflake.nix. - I uncommented and set
users.users.root.openssh.authorizedKeys.keysto import fromauthorized-keys.nix. - I added
nixos-facterto the system packages since Clan uses it. - I used
writeBashBininstead ofwriteBashso that the devshell gets arun-pixiecorecommand.
Here is the modified system.nix:
{
  nixpkgs,
  hostSystem,
  targetSystem ? "x86_64-linux",
  authorizedKeys ? import ./authorized-keys.nix,
}:
let
  sys = nixpkgs.lib.nixosSystem {
    system = targetSystem;
    modules = [
      (
        {
          config,
          pkgs,
          lib,
          modulesPath,
          ...
        }:
        {
          imports = [
            (modulesPath + "/installer/netboot/netboot-minimal.nix")
          ];
          config = {
            ## Some useful options for setting up a new system
            # services.getty.autologinUser = lib.mkForce "root";
            # console.keyMap = "de";

            users.users.root.openssh.authorizedKeys.keys = builtins.attrValues authorizedKeys;

            environment.systemPackages = [ pkgs.nixos-facter ];

            system.stateVersion = config.system.nixos.release;
          };
        }
      )
    ];
  };

  hostPkgs =
    if targetSystem == hostSystem then sys.pkgs else nixpkgs.legacyPackages.${hostSystem};

  build = sys.config.system.build;
in
hostPkgs.writers.writeBashBin "run-pixiecore" ''
  exec ${hostPkgs.pixiecore}/bin/pixiecore \
    boot ${build.kernel}/bzImage ${build.netbootRamdisk}/initrd \
    --cmdline "init=${build.toplevel}/init loglevel=4" \
    --debug --dhcp-no-bind \
    --port 64172 --status-port 64172 "$@"
''
Finally, in flake.nix I changed packages to:
  packages = [
	clan-core.packages.${system}.clan-cli
	(import ./system.nix {
	  inherit nixpkgs;
	  hostSystem = system;
	})
  ];
Then all I had to do was set the temp IP tables firewall rules like the wiki recommended and run the new command:
sudo iptables -w -I nixos-fw -p udp -m multiport --dports 67,69,4011 -j ACCEPT
sudo iptables -w -I nixos-fw -p tcp -m tcp --dport 64172 -j ACCEPT
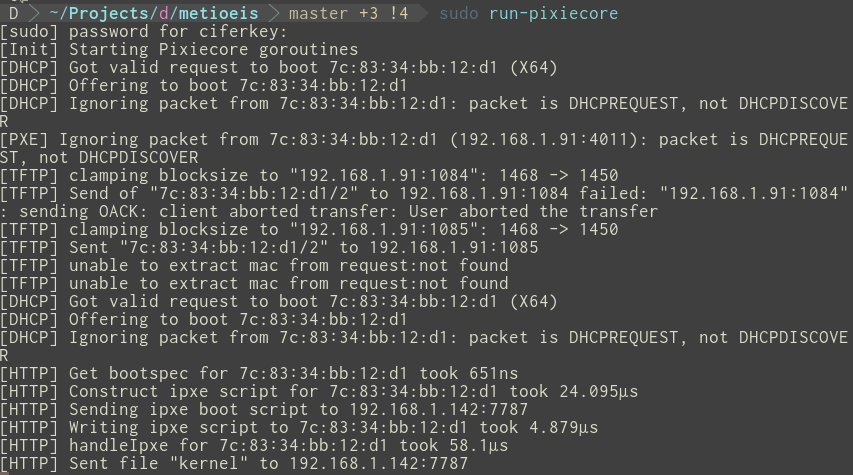
sudo run-pixiecore
Pixiecore built a NixOS image and waited for a machine to connect. With that, I powered on my Beelink, held F7 and selected the network boot option. Some text scrolled by and the machine booted into NixOS, primed to install Clan.
Installing Clan to the PXE booted system
From here I continued using the install on physical machine guide rather than the quick start.
The first step is to run update-hardware-config to generate a facter.json file. Nix-facter is a project that aims to improve on nix-generate-config by saving the details about hardware configuration that do not change. It stores those "facts" in their own file.
Weirdly enough, this failed for me with:
❯ clan machines update-hardware-config aristaeus --target-host root@192.168.1.142
[aristaeus] $ nixos-facter
[aristaeus] 2026/08/07 23:44:26 failed to scan: failed to scan hardware: failed to
[aristaeus]
===================================== Command =====================================
ssh \
    root@192.168.1.142 \
    -o ControlMaster=auto \
    -o ControlPersist=1m \
    -o ControlPath=/tmp/clan-sshsq3i673b/socket \
    -- bash \
    -c ''"'"'exec "$@"'"'"'' \
    -- nixos-facter

===================================== Stderr ======================================
2026/08/07 23:44:26 failed to scan: failed to scan hardware: failed to read input devices: invalid name: N: Name="OBINS OBINS

Return Code: 1

Failed to inspect Machine(name=aristaeus, flake=/home/ciferkey/Projects/clan/metioeis). Address: root@192.168.1.142
To save future travelers some time, this was due to my Anne Pro 2 keyboard that was plugged in. Generation runs fine once the keyboard is unplugged.
Next I needed to describe the disk layout that Disko will apply. For the disk template I went with the simple ext4-single-disk option:
❯ clan templates apply disk ext4-single-disk aristaeus --set mainDisk "/dev/disk/by-id/nvme-512GB_SSD_CN174BH4118997"
Committed machines/aristaeus/disko.nix to git
Applied disk template 'ext4-single-disk' to machine 'aristaeus'
I am just using this mini PC for testing out some configuration, so I don't need BTRFS with snapshotting or anything fancy.
Finally, with a simple command, I had Clan installed:
clan machines install aristaeus --phases disko,install,reboot --target-host root@192.168.1.142
With luck, the machine rebooted from disk instead of over PXE boot. After rebooting the machine had a new IP address and so I updated clan.nix. If the IP had not changed, then I would have need to run ssh-keygen -R since the identity will have changed.
Boot and rally
If you have physical access to a machine, it's probably easier to install NixOS with a live USB. However, PXE boot is a nice tool to have in your toolbox. Normally PXE boot can be fiddly, but Nix made the process smooth and reusable. Now I have everything set up for the next time I lose my USB drive.
All I had on hand was a fancy double-sided C+A USB 3.2 drive. Unfortunately, USB 3.X devices are known to start up too slowly for USB boot to catch them. ↩︎
No spam, no sharing to third party. Only you and me.


Member discussion