Review of HackerBox 0119 - Geopositioning
Another month, another box
My second HackerBox arrived! This is my review of HackerBox 0119, Geopositioning which follows my review of the previous HackerBox 0118, More Human. Honestly a GNSS based kit could not have come at a better time for me.
Like the previous box, there is an official guide on Instructables. In the instructions they note there are free DEFCON 33 badges up for grabs. I've never attended DEFCON, so I didn't get one. They also linked to their Wireless Workshop. Now that one I may pick up in the future.
The front matter also noted that:
Yes, this month marks one full decade of HackerBoxes and tin is the traditional ten year anniversary gift.
Congrats to the team!
An introduction to how GNSS works
The guide included a video on how GPS works. I was initially turned off because the voice in the video was generated. Then I realized the author lives in Spain. On their main channel they voice all their videos themselves in Spanish. They use TTS to provide versions of their videos in English, which I think is a really cool use case. I was too quick to assume the video was AI slop. Also the author does all the 3D animations themselves!
Rather than write up a summary, I suggest you go watch the video directly. I took notes as I watched, but the author eventually answered every single question I had. All I will add is that the video mentions a coordinate system WGS 64. That was explained in a really cool way in Android Developers Backstage Episode 96: Location: It's Where It's At.
Trying out the ESP-WROOM-32 Development Board
This was my first time using an ESP32. I've been wanting to try one for a while. The best part compared to the last box is no more micro-usb [1].
The instructions had me set up the board before doing any soldering. Once again they used the Arduino IDE. I'll note that the guide said to use the "COM port that appears when the ESP32 is connected and turned on", however I see the device listed as a USB serial port instead.
Once again, the blink sketch was used as a test to verify the board. The instructions said to add #define LED_BUILTIN 2 to the top with no explanation as to why. The best I could figure out is that the Arduino board variant for the ESP32 does not define the LED, so we have to specify. Also, I liked that this time they directed you to modify and play around with the sketch.
Assembling the Thrifty Yeti Locator
This box uses the Thrifty Yeti Locator (TYI), which is similar to the Cheap Yellow Display (CYD), but with a GPS module. Since the TYI uses the same pin mapping, they provided HackerBox 0099: Neunundneunzig as a reference.
The headers are already attached to the board this time, but I still got to practice some soldering. They had me solder:
- 14-pin and 4-pin headers on the TFT display.
- An optional 12-pin header expansion connection on the edge of the PCB.
- The GPS module to the PCB.
- The display module to the PCB.
The GPS module was a castellated module, which I had never worked with, but they linked to a good tutorial from SparkFun. Fortunate timing, because I am going to do some GBA SP mods that uses a castellated module. Also, this time I had picked up some flux [2], and a solvent alcohol dispenser which I learned about from this video on how to have good solder joints. Perfect timing since the instructions said flux was highly recommended for castellated components.
The GPS test program
In my last review I didn't dive into the examples sketches much. This time I wanted to actually sit down and understand what they were doing.
I had to install three libraries for this board:
- Adafruit ILI9341 - The TFT display must be sourced from Adafruit, since this library is how the display is driven.
- EspSoftwareSerial - Arduino has a software implementation of serial communication. This library is an implementation for ESP32.
- TinyGPSPlus-ESP32 - So, the National Marine Electronics Association has a spec NMEA 0183 for communicating with electronic devices, including GPS. I had looked into this before when I was researching how to use GPS on a future project. There is also this excellent Hackaday article which I saw last month that talks about NMEA.
What struck me is that there is no declarative package management with Arduinos. You just install libraries using the UI. I suppose that keeps the barrier to entry down, but it feels really sketchy.
The testing program is quite simple. Aside from the setup code the only interesting part was:
EspSoftwareSerial::UART gpsSerial;
TinyGPSPlus gps;

void loop()
{
  while (gpsSerial.available() > 0){
    if (gps.encode(gpsSerial.read())) {
      DisplayLocation();
      delay(1000);
    }
  }
}
So we read from our software serial for the GPS [3] and send the bytes into the NMEA parsing library. What's actually being passed though?
Well, NMEA uses "sentences". These are some example sentences I pulled from my device through the serial monitor: [4]
$GPRMC,185603.000,A,XXXX.XXXX,N,XXXXX.XXXX,W,0.82,213.46,151025,,,A*7C
$GPVTG,213.46,T,,M,0.82,N,1.51,K,A*30
$GPGGA,185604.000,XXXX.XXXX,N,XXXXX.XXXX,W,1,4,2.00,-52.6,M,-33.7,M,,*79
$GPGLL,XXXX.XXXX,N,XXXXX.XXXX,W,185604.000,A,A*4C
$GPGSA,A,3,26,31,32,28,,,,,,,,,2.24,2.00,1.00*08
$GPGSV,3,1,09,31,73,317,20,28,61,049,22,26,60,198,18,32,38,126,27*72
$GPGSV,3,2,09,03,37,296,19,29,21,081,17,25,17,045,,04,16,308,*7C
$GPGSV,3,3,09,16,,,21*74
$GPRMC,185604.000,A,XXXX.XXXX,N,XXXXX.XXXX,W,0.81,214.66,151025,,,A*77
$GPVTG,214.66,T,,M,0.81,N,1.51,K,A*36
$GPGGA,185605.000,XXXX.XXXX,N,XXXXX.XXXX,W,1,4,2.00,-52.5,M,-33.7,M,,*79
$GPGLL,XXXX.XXXX,N,XXXXX.XXXX,W,185605.000,A,A*4F
$GPGSA,A,3,26,31,32,28,,,,,,,,,2.24,2.00,1.00*08
Here is an in-depth guide to the NMEA sentence format. We can see the following sentence types in my snapshot: GPRMC, GPVTG, GPGGA, GPGLL, GPGSA, GPGSV. The main detail I want to add in addition to that guide, is the repeating nature of the sentences. You get one of each message type except for GPGSV. That is the number of satellites in view. In my case there were three, so the second part of the message was "3" and three messages were sent.
The TYL Mapping experiment
The kit contains a micro SD card and a SD card adapter. The TFT screen itself actually has the SD cards slot built in. All of the SD file-system interactions are abstracted away through the Adafruit ImageReader Library. The sketch reads two .bmp images saved to the card: a rough map of the US, and a street level map of Gulfgate village which is near the HackerBox headquarters:
#define NUM_MAPS     3
int bestMap = NUM_MAPS;
struct mapData maps[NUM_MAPS]=
{
    {{"/US.bmp"}, 21.45, 54.83, -124.98, -66.80 },
    {{"/GulfGate.bmp"}, 27.25560, 27.26195, -82.52425, -82.51471},
    {{"/map.bmp"},0,0,0,0}
};
The numbers are the latitude and longitude bounds of the maps. I was able to export my local area from OpenStreetMap, edit the image to 320x240, and add a new entry to the mapData struct. The map to use is chosen in the SetBestMap method by seeing which map contains your current position and is tightest:
      if (bestMap < NUM_MAPS){
        if ((maps[i].lat2-maps[i].lat1) < (maps[bestMap].lat2-maps[bestMap].lat1)){
          //current map (i) is "tighter" (more zoomed in) than the last bestMap
          bestMap = i;
        }
      }
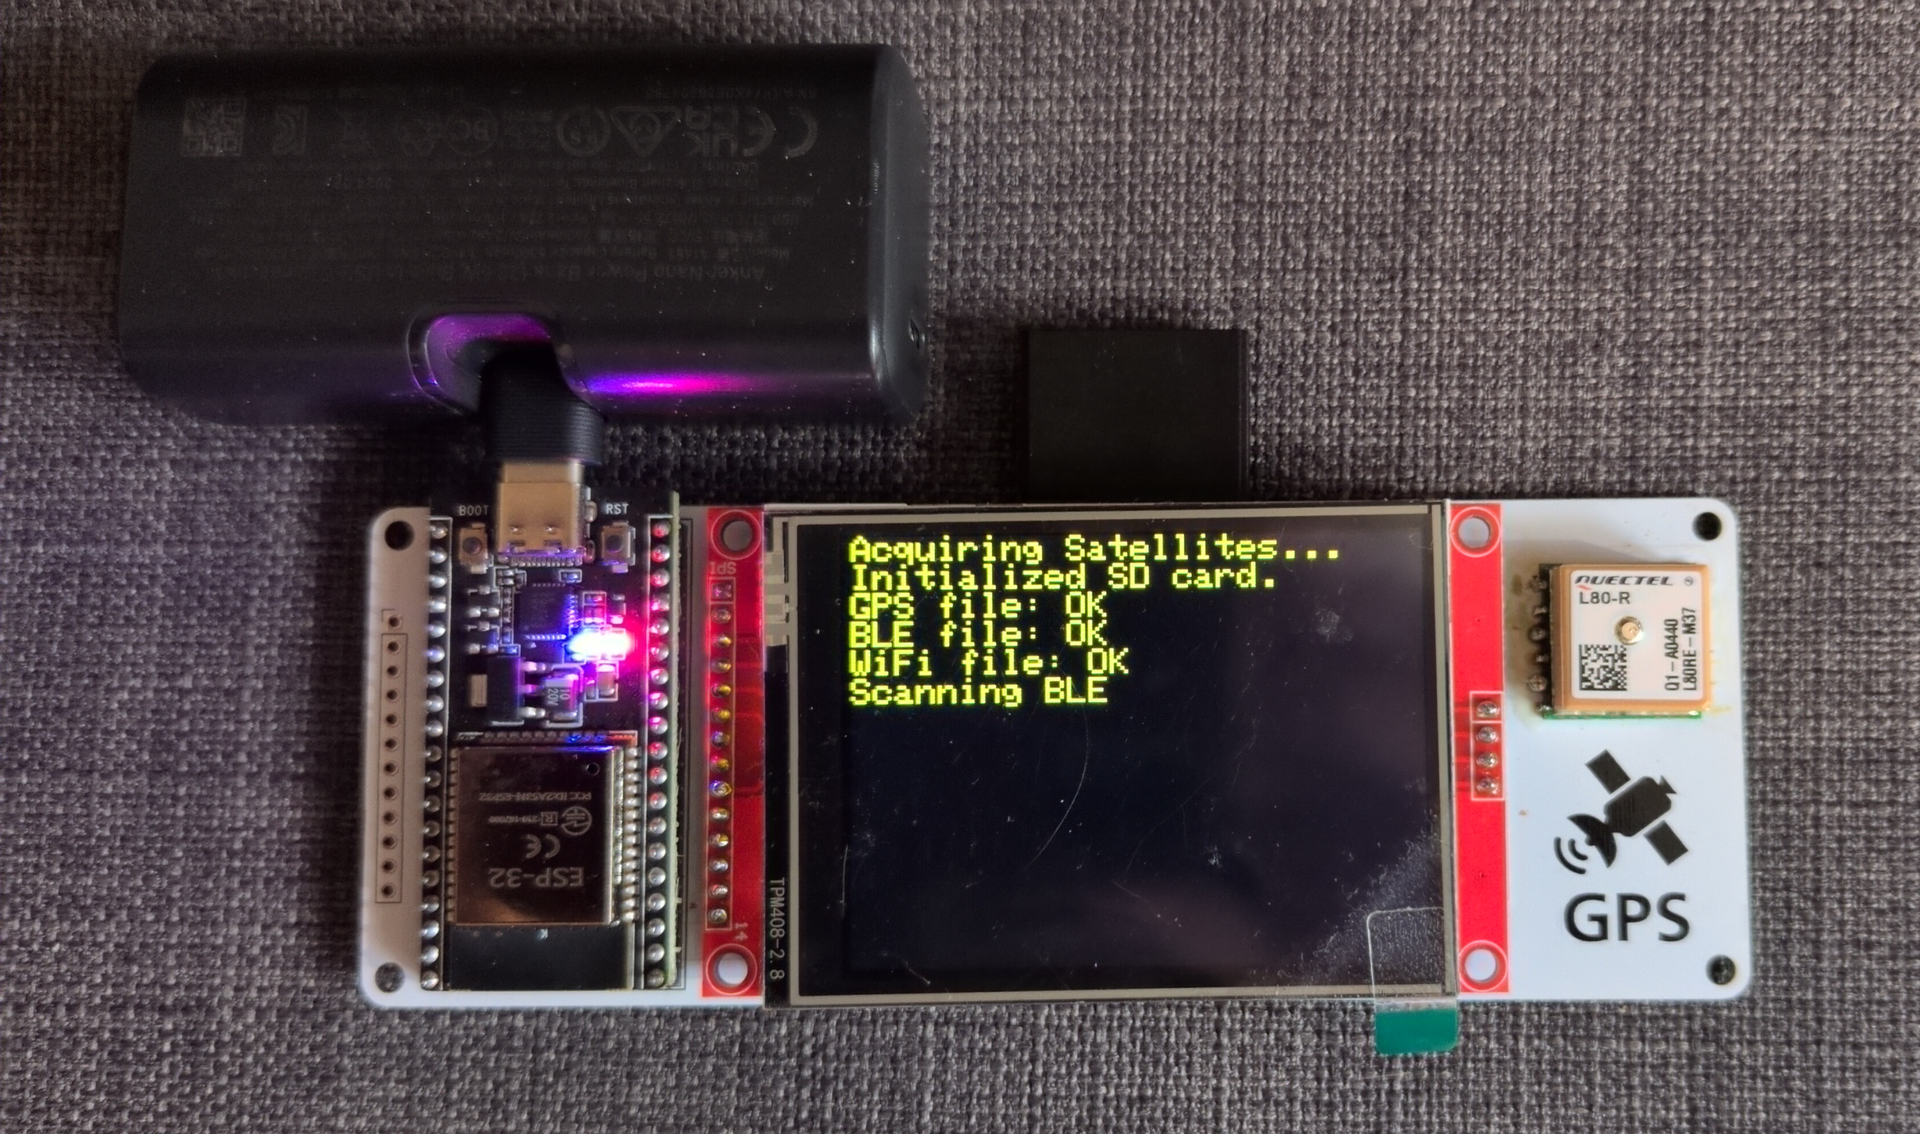
GPS acquisition with this chip takes a good bit of time, especially when you are inside. Some GNSS hardware are backed by coin cell batteries, or lets you bootstrap startup by providing nearby satellite information. Neither option is available on this board, so cold starts are slow. However, if you update the sketch and upload without powering down the board, the GPS will not have to reacquire the location!
The instructions also point you towards ESP32_GPS and IceNav . I didn't have a chance to try them on the board yet.
ESP32 Marauder
This part involved trying out a WiFi/Bluetooth toolkit called ESP32 Marauder. [5] I installed it to the TYL using a web flasher built with the Adafruit WebSerial ESPTool. Firefox intentionally does not implement WebSerial for security reasons, so I had to flash with Chromium. [6] As they noted in the guide, the timing is a bit tricky, but I eventually got my device flashed.
The style of the included tutorial video was not my taste, but does go through all the features. Instead I found a written wiki on GitHub is that really detailed.
Also, there are no control buttons on the board, but the TFT screen is touch sensitive. Neither of the previous sketches were interactive, but ESP32 Marauder is fully navigable using touch.
Closing thoughts
GPS mapping and trying out ESP32 Marauder were absolutely perfect for what I want to do in a future project: Scanning BLE and WiFi APs and correlating them with GPS locations. I would like to do this using Embassy, but the WiFi and Bluetooth on this particular ESP32 dev board are not supported by the Rust HAL. For now I'll do a quick prototype in Arduino and pick up a different ESP32 in the future.
Everything is USB-C in the future. ↩︎
They also added the helpful note to "make sure the flux in your solder core matches the liquid flux you are using", which I was not aware of. ↩︎
Amazingly satellites talk at only a 9600 baud rate. ↩︎
Note: the
XXXX.XXXXparts are redacted longitudes and latitudes, and yes, I made a robot do the redaction. ↩︎While searching for more information I came across tindie, which is a market for makers to sell devices they build! ↩︎
There is a [polyfill extension, but it requires a native application and is not available on NixOS. Probably for the best. ↩︎
Member discussion