3D Printing the Smartspin 2k with an Ender 3 v2
As I mentioned in last years post race report, after I broke my toe by dropping a blender I went out and found a used Schwinn IC4 stationary bike so I could train while my foot was healing. I used QZ Zwift with an usb ANT+ adapter to pair my phone to the bike and broadcast my speed and power to my Garmin watch. Unfortunately I still had to manually control the resistance knob on the bike by hand.
The SmartSpin2k project lets turns bikes into ERGs on the cheap. Back in November of last year, I bought a PBC + wiring harness kit and then... procrastinated. Once the warm weather came around I was biking and running outside and needed an ERG less. The cold weather is coming though, so I'm finally putting everything together!
The printer, auto leveling, and a new firmware.
Back in 2021 I bought a Ender 3 v2 printer from Micro Center. First, I printed the boat benchy. Then I printed this Mask of the Ancients from FFXIV. [^ At the time I wanted to export the Dragoon armor mesh from the game and print them, but never got around.] Then I was distracted and never used the printer again.
Recently however, I dusted off my printer, did a test benchy and ... made spaghetti. Seems I had forgotten how to operate the device [^ Including how to load the filament https://www.youtube.com/watch?v=bv46Wu87Z5k], since I didn't remember to level the bed. When searching for a how-to video I found this guide. [^ That YouTube noted was in my watch history.], that shows a paper leveling technique using a special gcode.
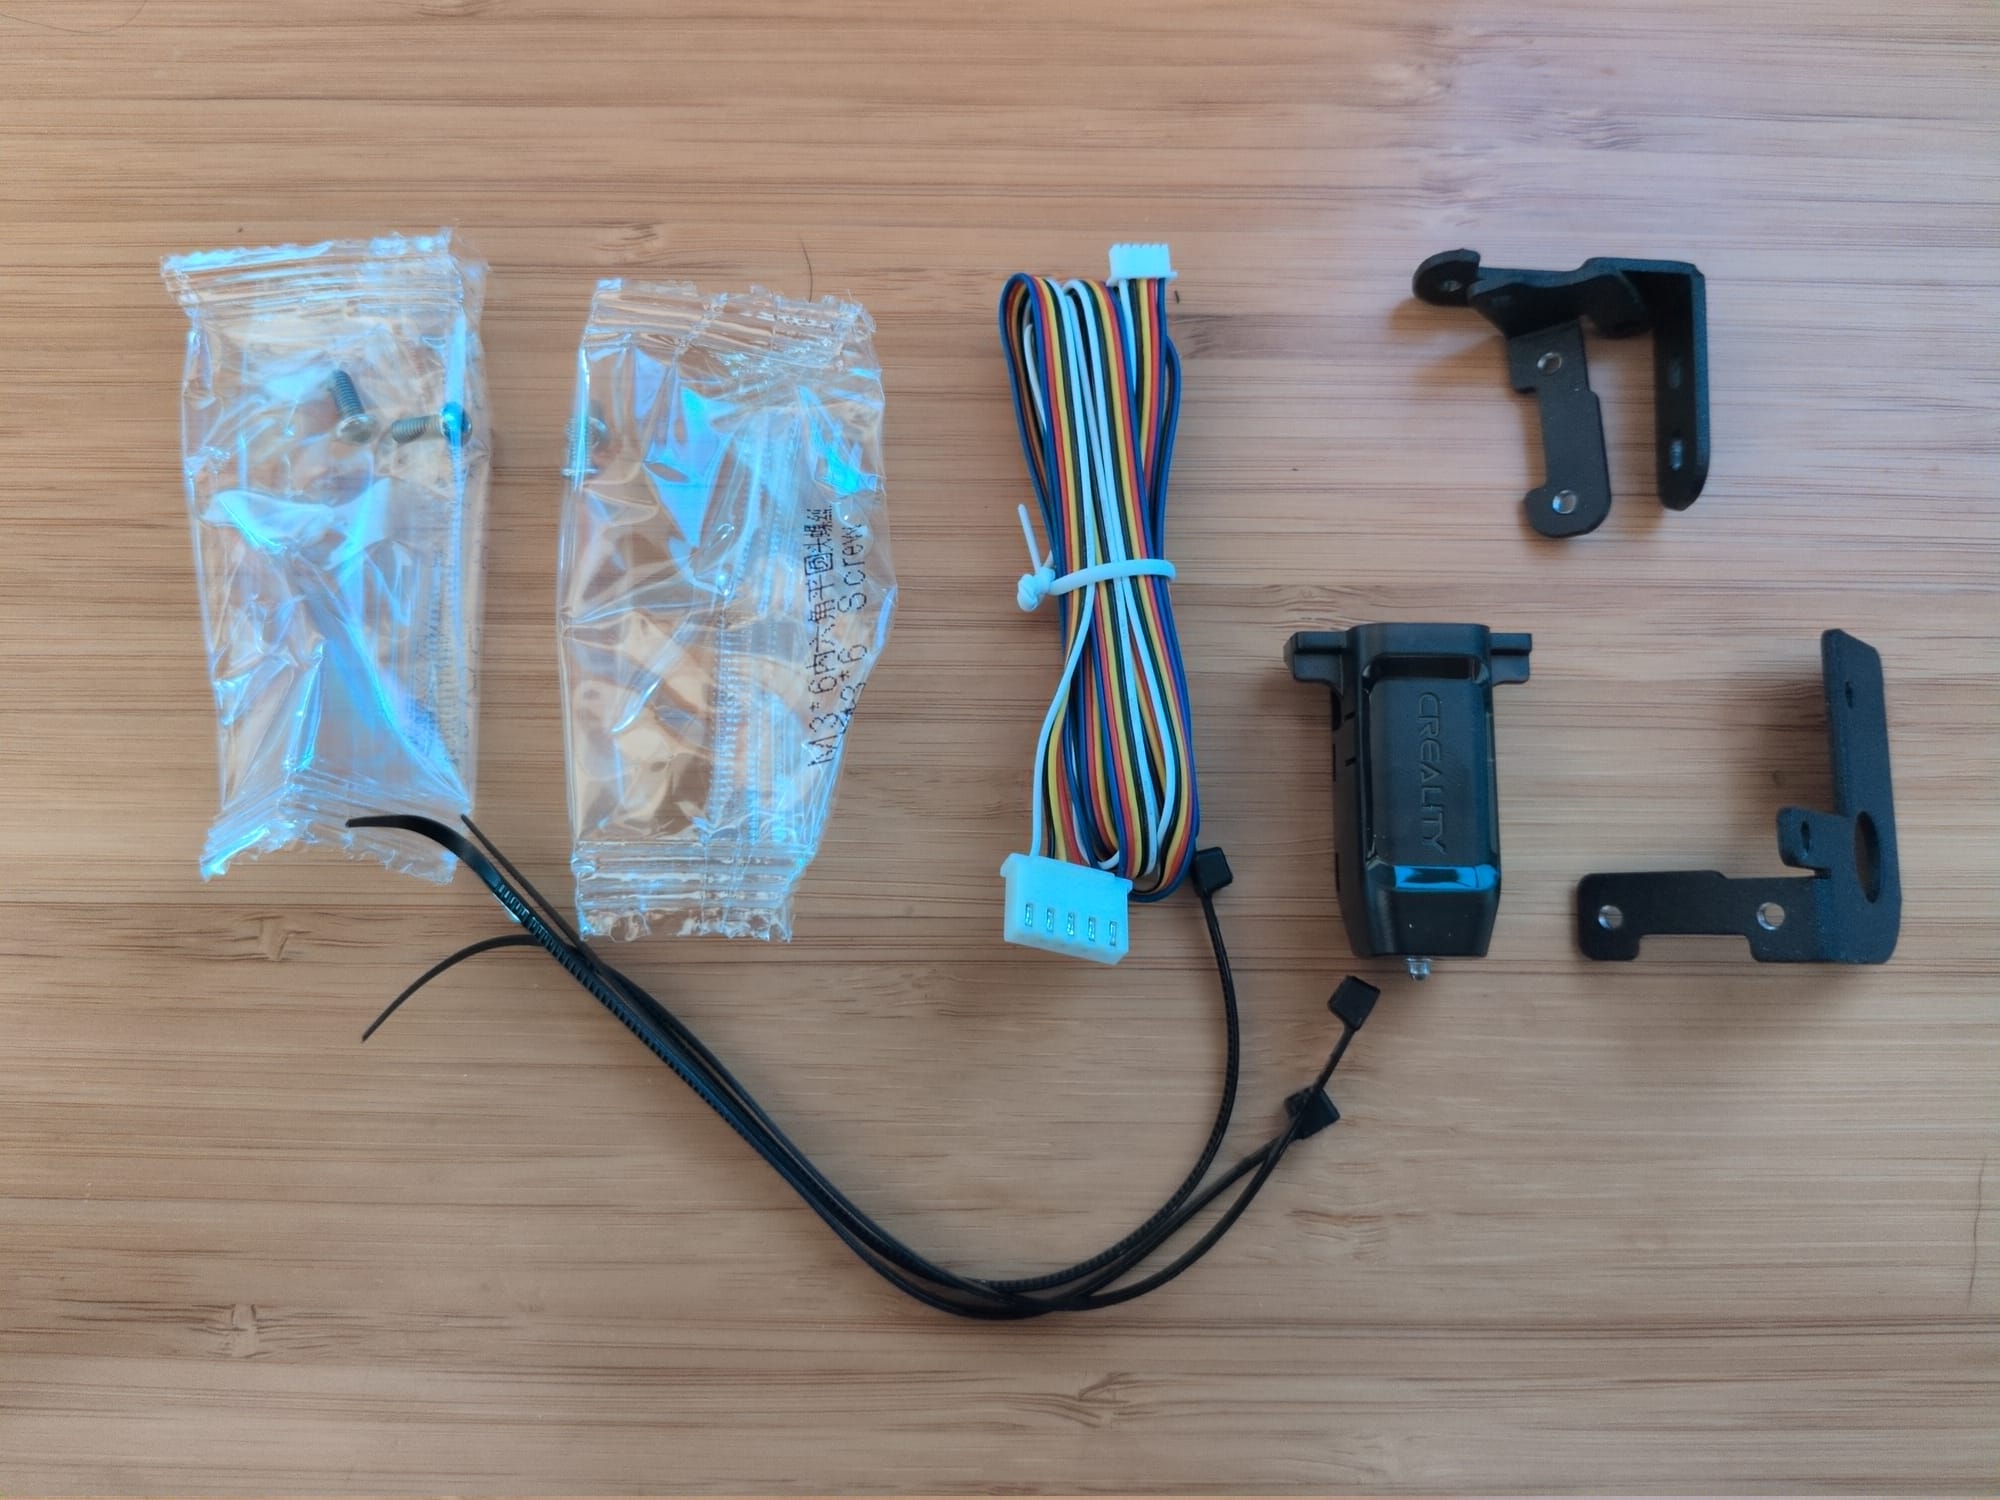
However, a lot has changed with printing since 2021. [^ OK, what I'm going to talk about actually first released in 2015, but you get my point.] Now I can add auto leveling to my printer for pretty cheap. bltouch is a probe that mounts on the side of the extruder and uses a hall sensor to measure the bed depth. This can be used to automate leveling the print bed. So long paper! [^ Actually you will still need paper for setting the z-offset, but the process is much less annoying.] The device was ~$45 without the cable I need, or the printer specific mounting brackets.
In comparison, Creality released the CR Touch, with all the necessary parts for ~$39, so I grabbed one.
Some notes:
- The included paper instructions were uninformative, but this video cleared up the details.
- Installation requires taking a cover off the bottom of the printer which was a little awkward to do. Each side of the Ender 3 v2 has something jutting out, so I couldn't just lean the printer over.
- The kit includes three brackets, but I only need to use the one bracket that matched my printer. [^ The rest are scrap metal I suppose.]
The stock firmware on the printer does not support the new hardware. Creality offers a firmware that supports CR Touch, but the FOSS community has an even better solution. Mriscoc has a custom firmware for the Ender 3 V2 which has an extensive feature list.
Make sure to grab the right file from the release page. For me this was the "Experimental-Ender3V2-422-BLTUBL-LA-MPC-20250106.bin" because:
Ender3V2: my printer model.422: My board firmware was 4.2.2. [^They say you can peak through the vent to see the number, but I wasn't able do that.]BLTUBL: I have auto leveling instead of manual.
The release notes break down the file name parts in more detail. Installation is as simple as moving the file to the micro SD card and updating the filename to the current date.
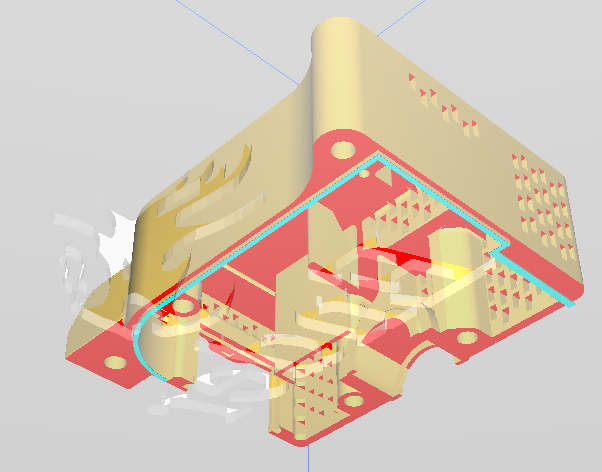
Finally, there is a calibration guide. Do not do what I did and skim the guide. The only thing that can be made with impatience is more spaghetti. If you try to auto mesh without tramming first:
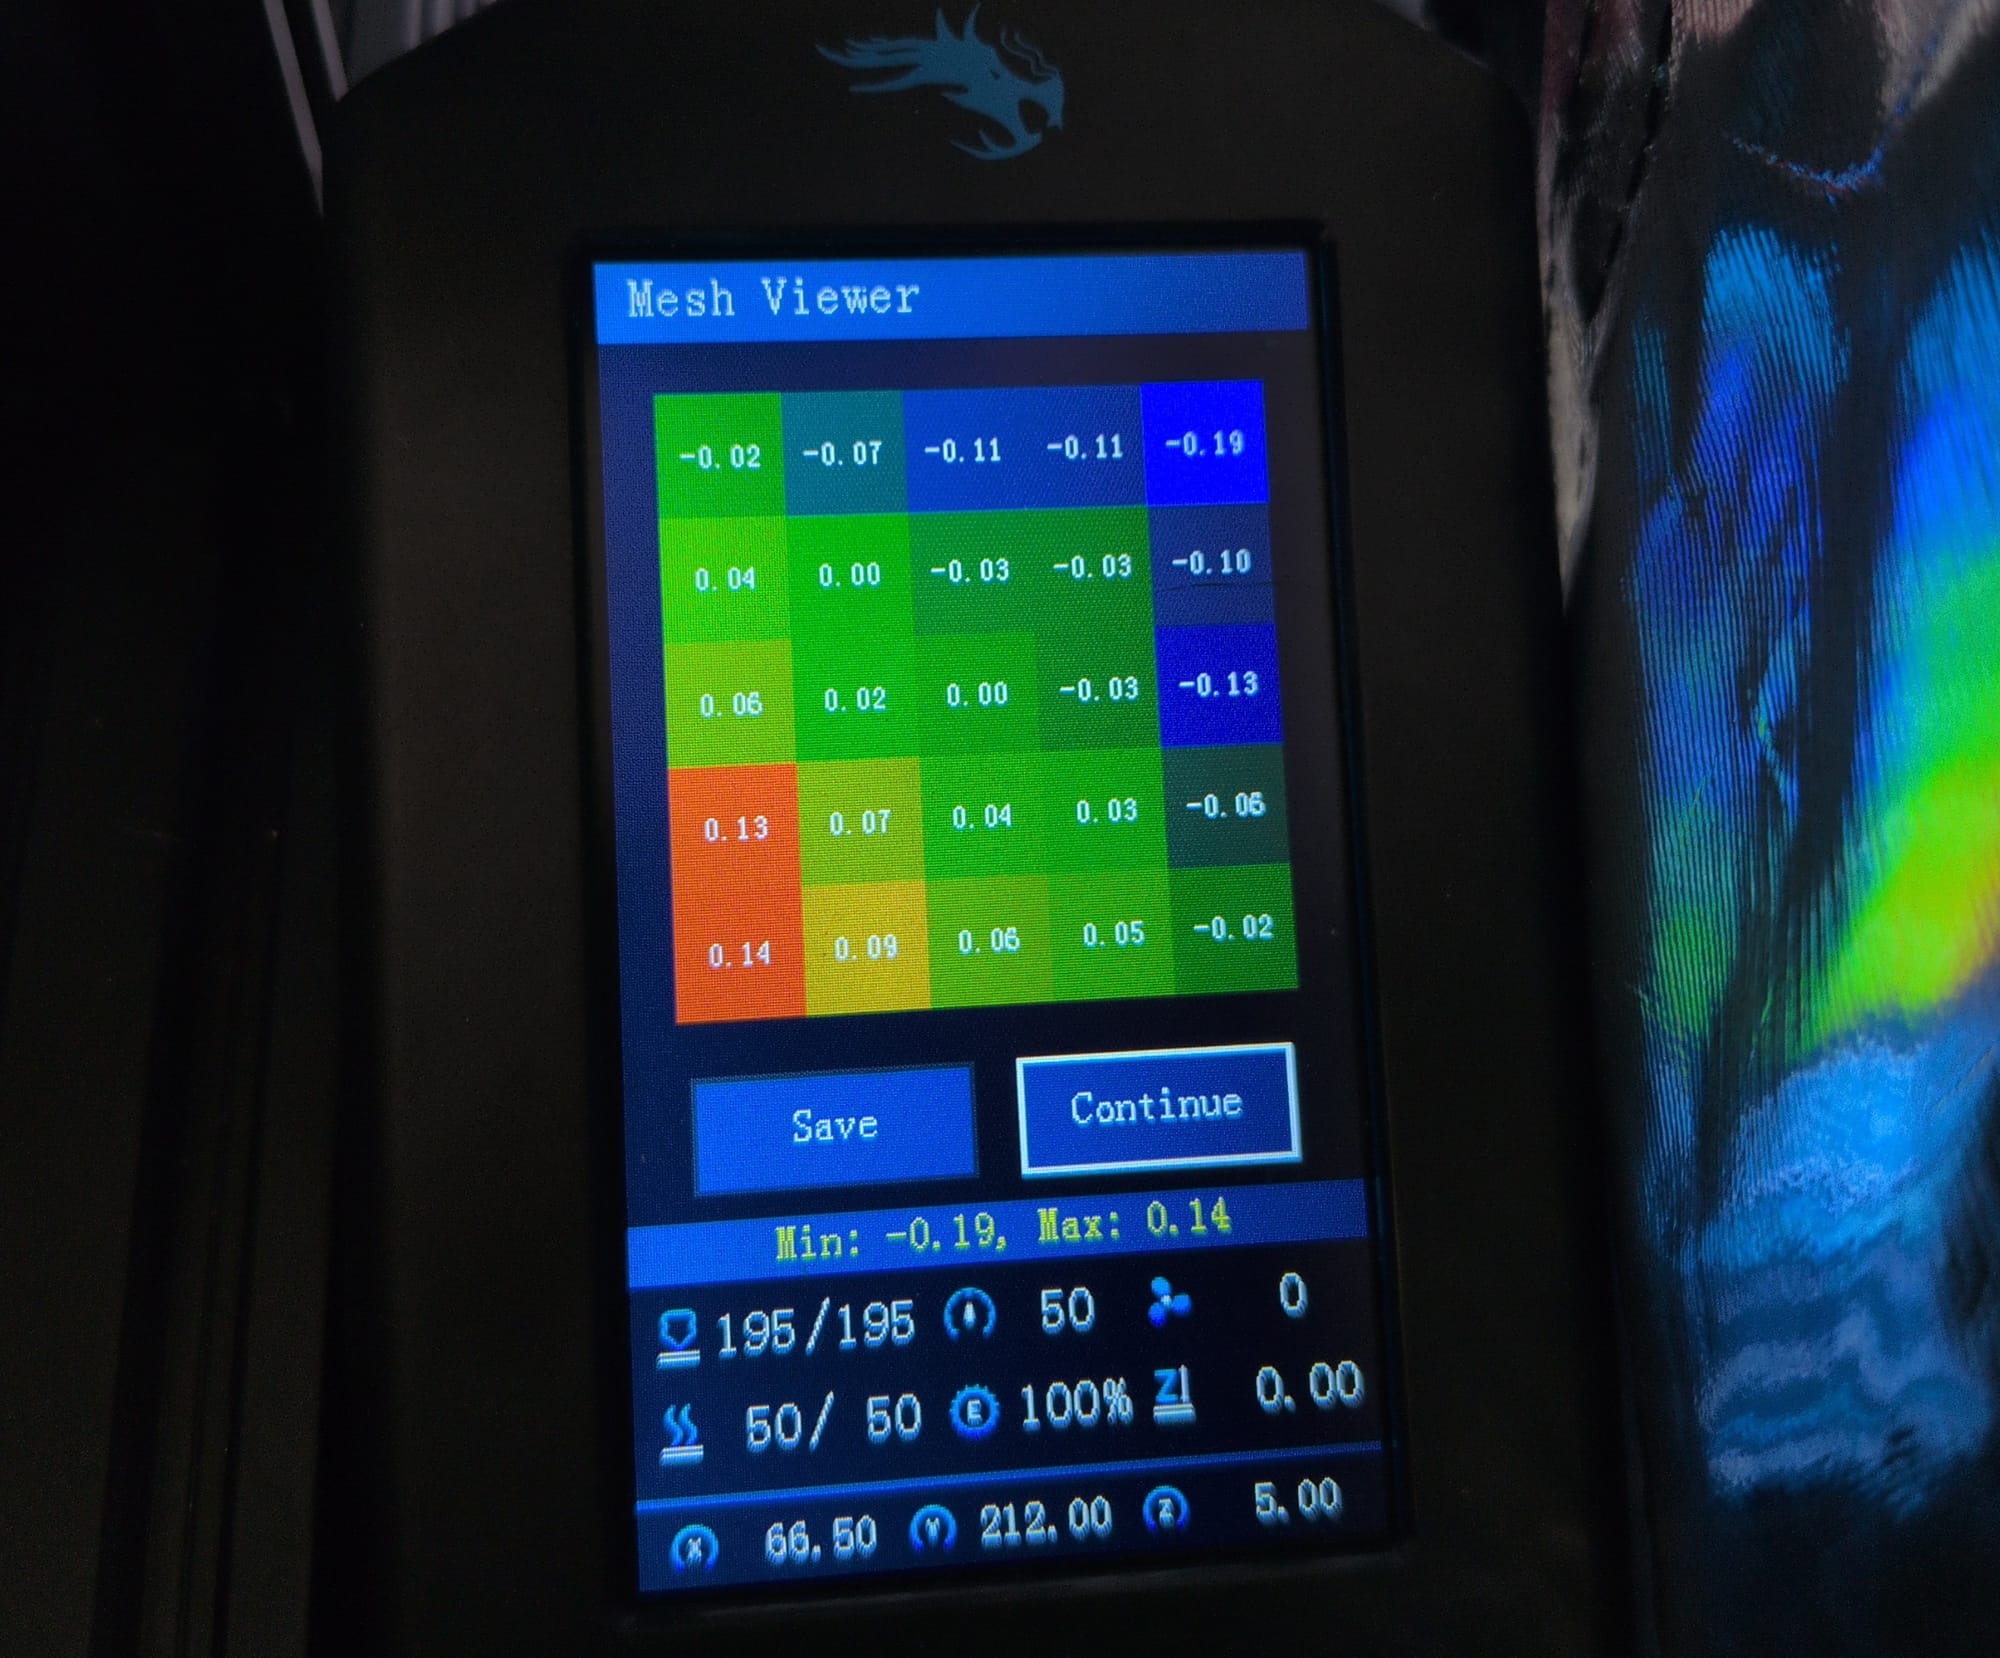
You will get an uneven mesh. Where as if you properly tram first:
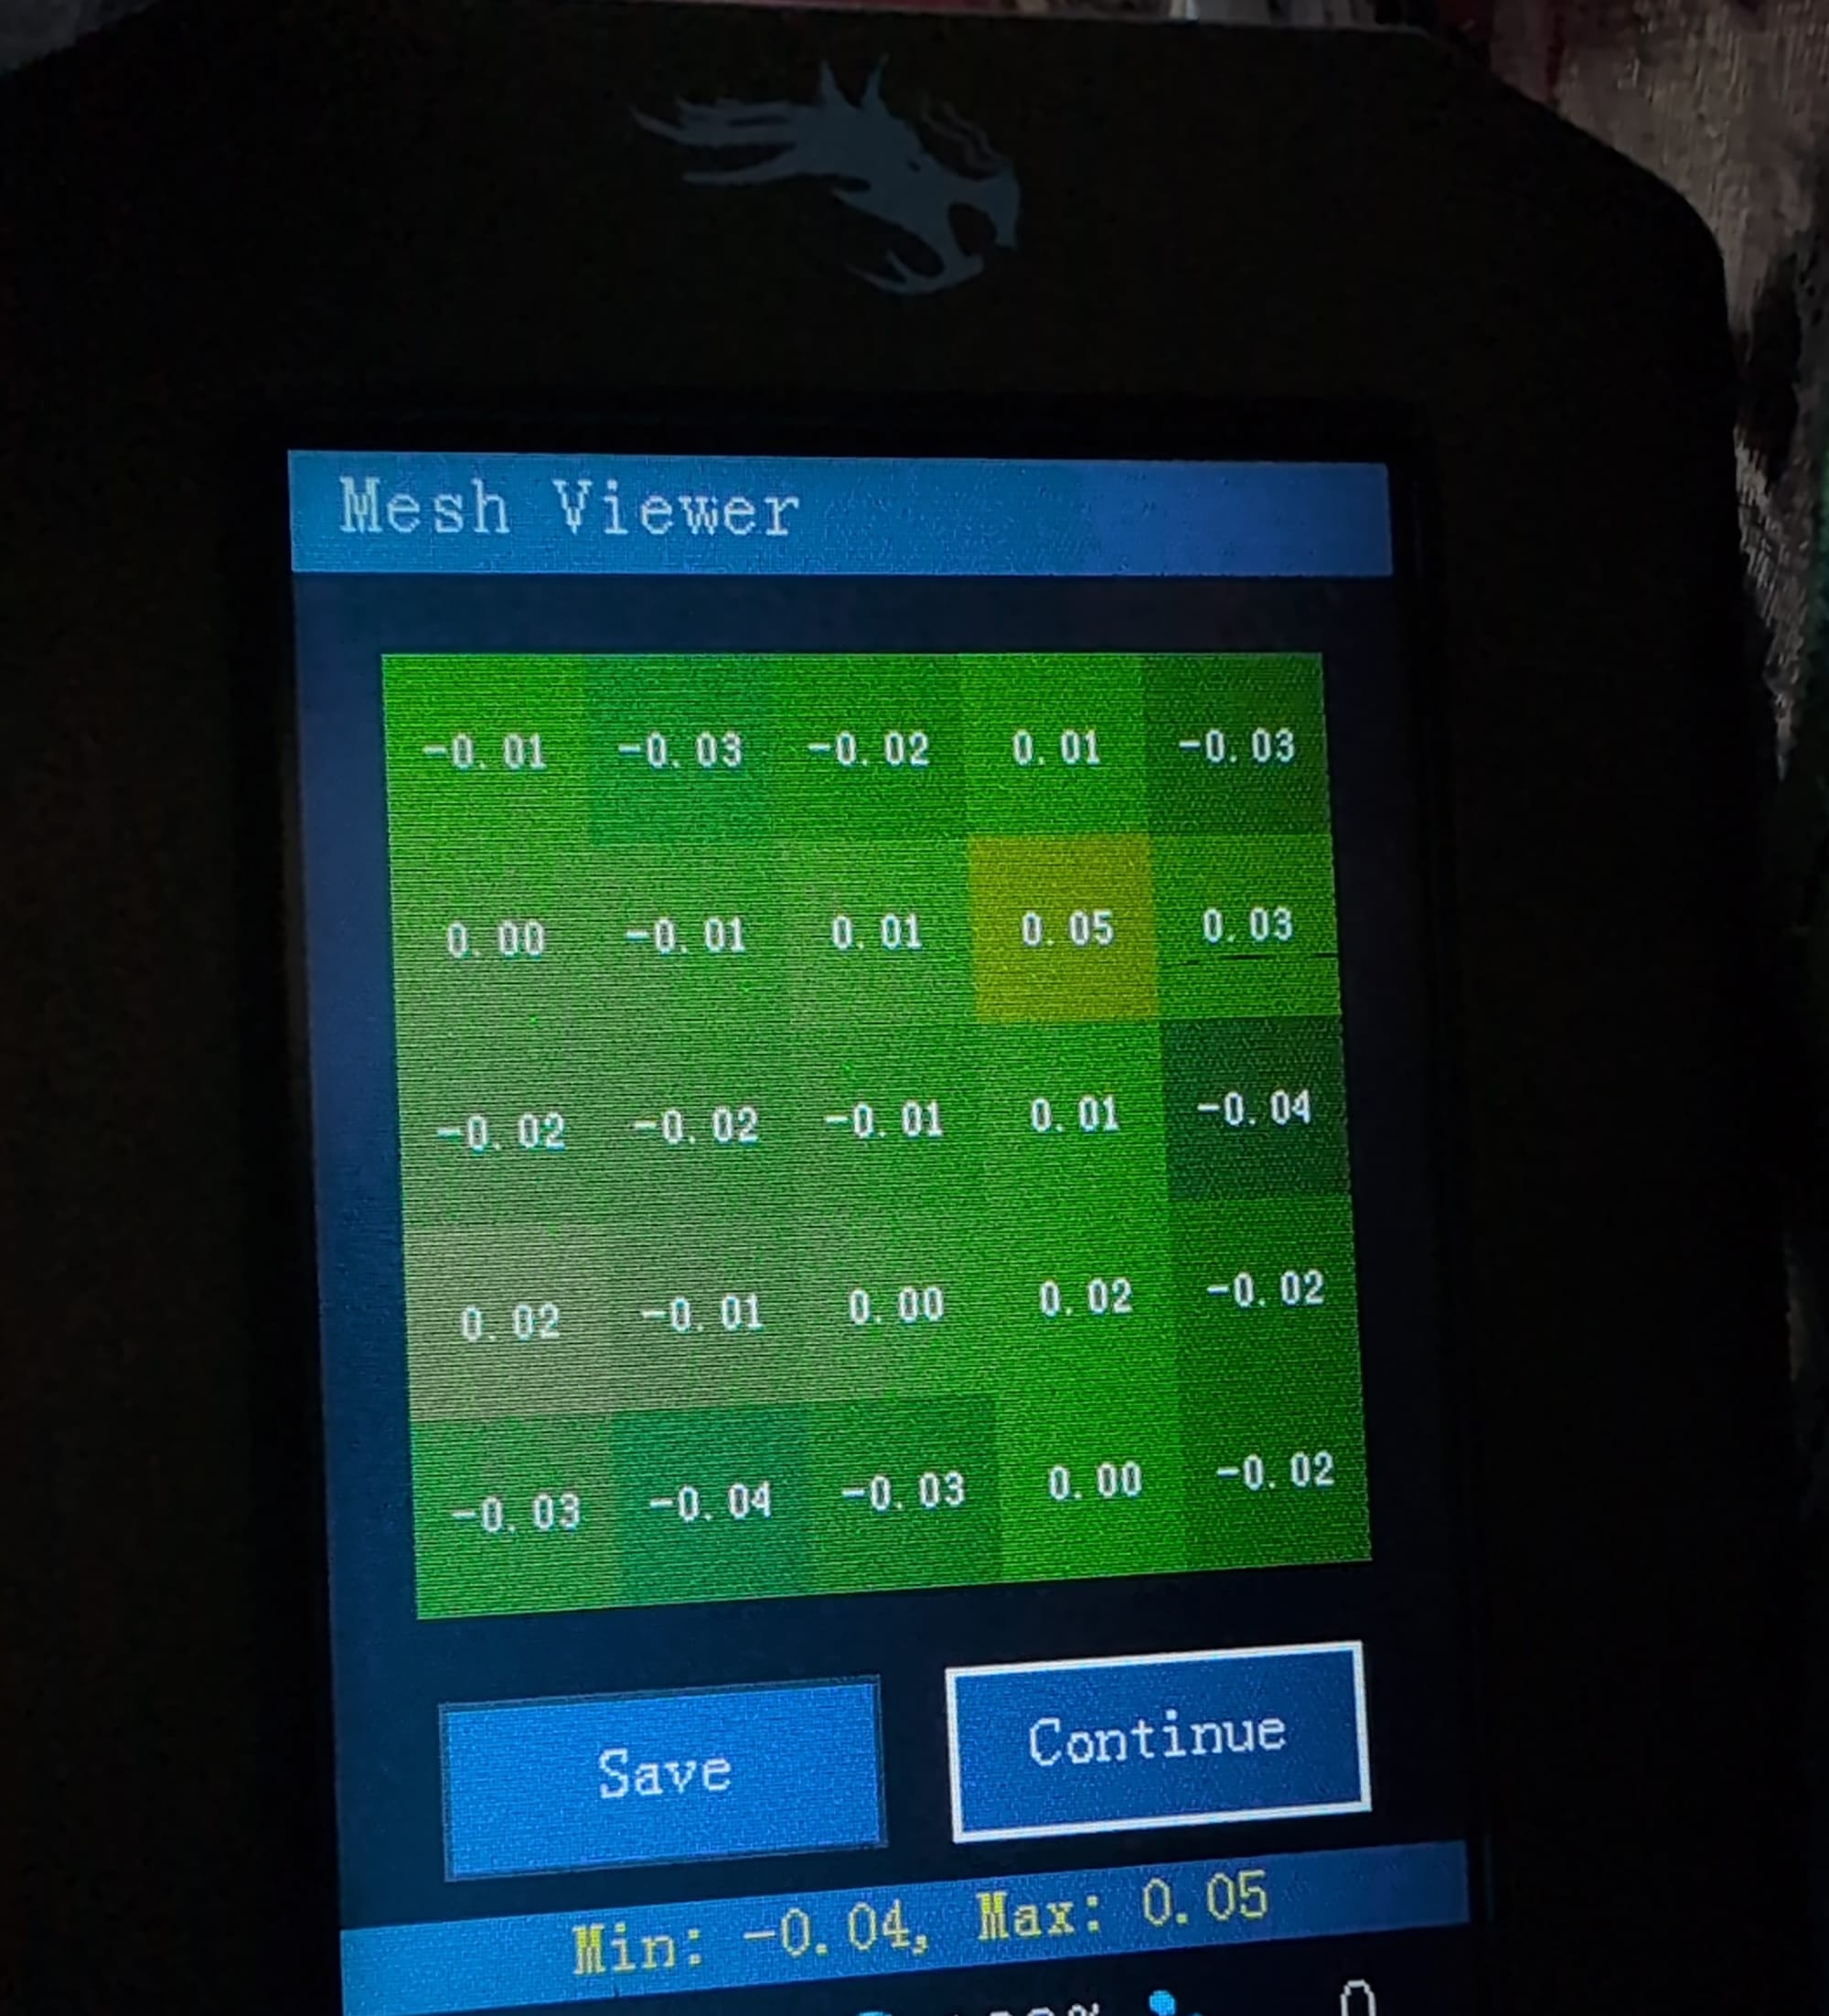
You will get a much better auto mesh.
I was initially confused that you need to both tram and level the bed. In the past I've often seen the terms used interchangeably, but I guess there is a difference between the two. [^This is the kind of pedantry I enjoy].
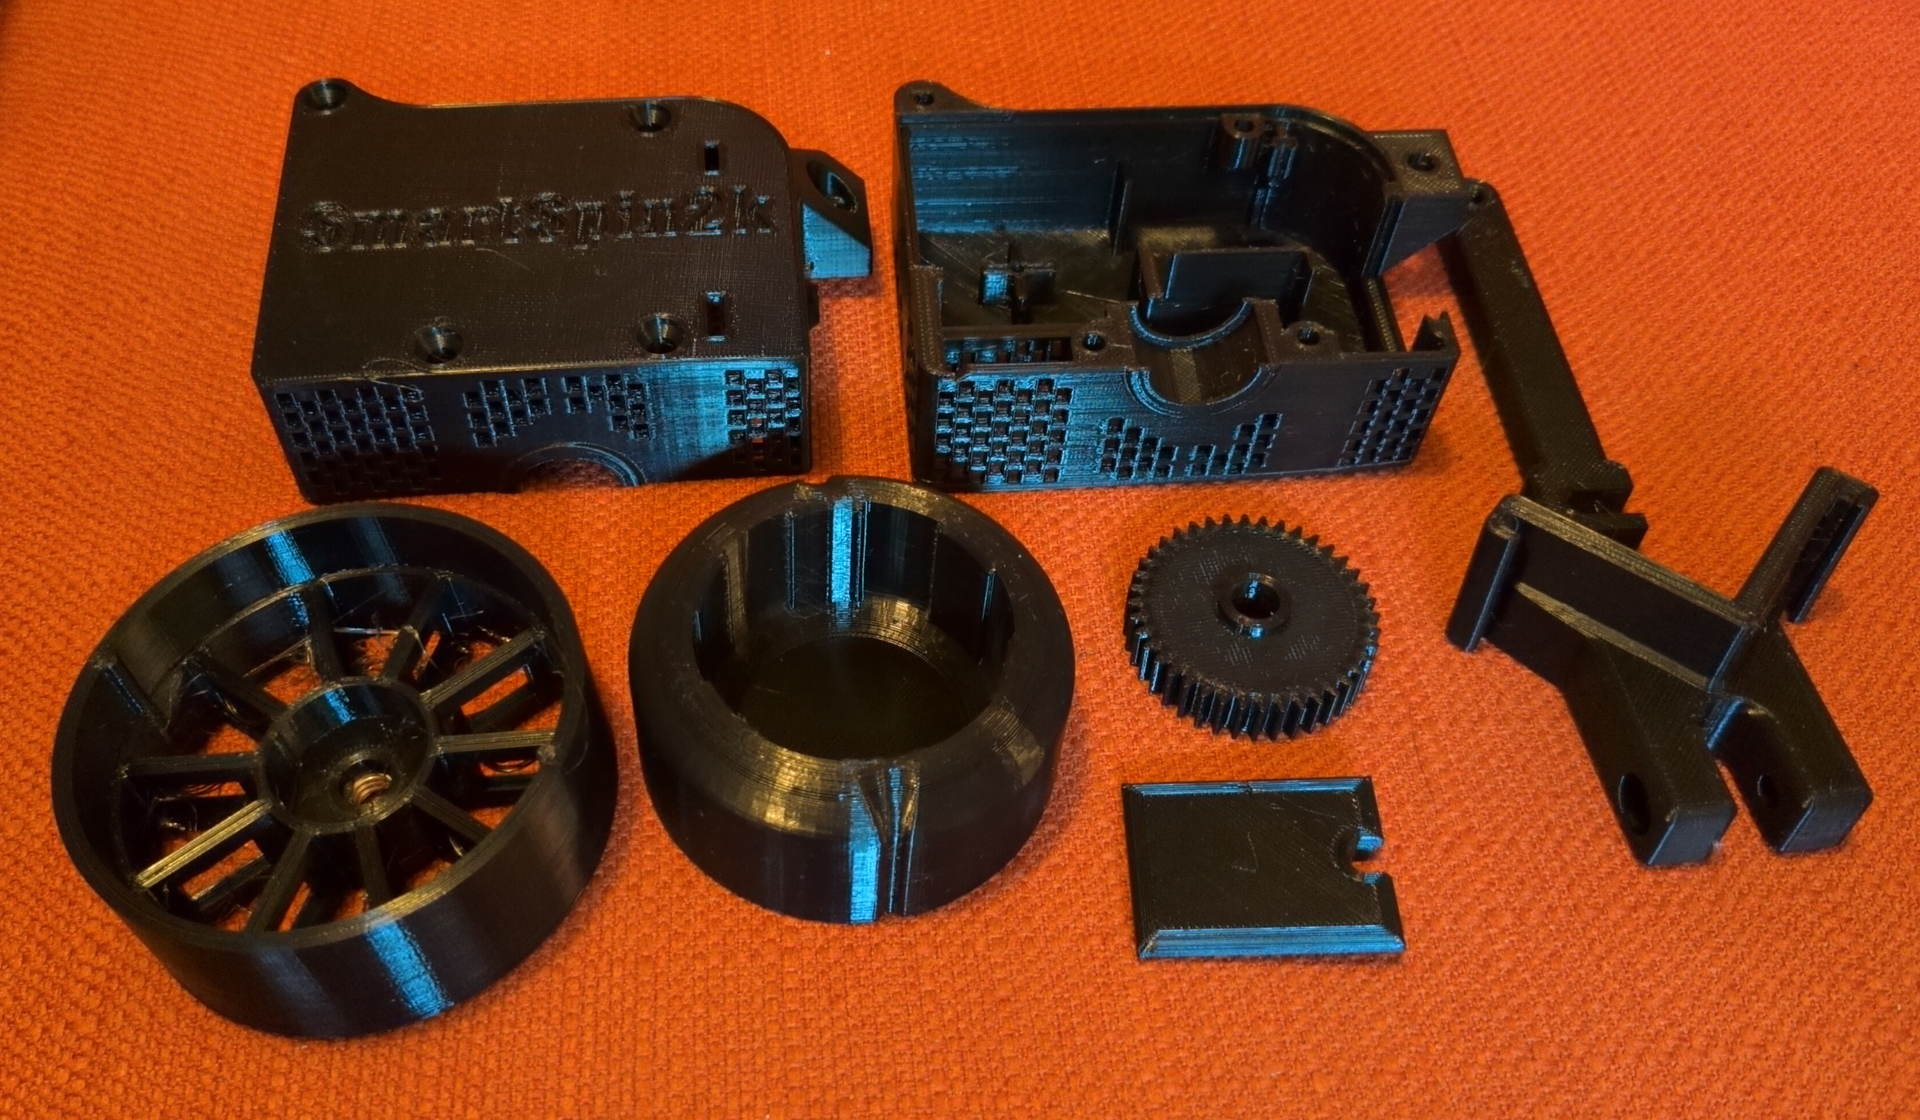
Preparing the parts for printing
The SmartSpin2k project has a couple of different versions and supports multiple bikes. So I needed to select the right set of parts to print. That meant starting with the V3 version of the case:
- Body_Drawing_Left.STEP [^ There is a no logo version of this part if you prefer.]
- Body_Drawing_Right.STEP.
- Window.STL.
In addition to the v3 parts, I needed to pick the correct versions of the common [^ Common in this case means shared between V2 and V3, and not common amoung the different bikes.] assets:
- armWithHook85.STL for connecting the SmartSpin 2k to the bike mount. There is a table where you can look up the arm length that fits different bikes.
- IC4 Mount.stp which connects to the head tube on the bike.
- Both the Spur gear 1M 11T.STL and Spur gear 1M 40T Hex.STL as internal gears. They note "If you'd like a metal shaft using a 5/16" bolt, print the 40T HEX, otherwise the normal 40T has a plastic shaft attached to the gear."
- Schwinn_IC4.STL insert, which is an adapter for the knob.
- Knob_Cup_Large_HEX.STEP for connecting the bike specific insert to the SmartSpin2k
- Optionally, several parts if you want shifter buttons. I technically do not need them since I will use structed workouts, but my kit included the parts so I will eventually print them.
Note that some of these parts are in their original CAD format of .step . So I needed to convert them to .stl. [^ There is an open issue for CURA to directly support .step files, but there is no traction yet: https://github.com/Ultimaker/Cura/issues/15603. ]. FreeCAD can do the conversion and has instructions that are important to follow to get a good print. I went with 0.01 mm for my maximum mesh deviation.
Once I had all the parts as step files, I just needed to slice them. There is custom startup G code to handle auto leveling that I had to set up in Cura. Aside from that I used all the default settings for my printer and sliced in standard quality. [^ Also, on NixOS, I used the cura-appimage and freecad packages without any issues.]
Actually printing the parts
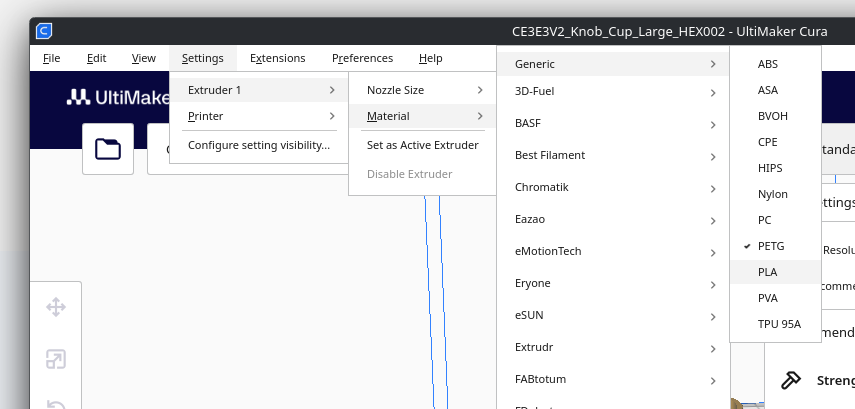
For filament, the instructions said to use ABS, ASA, PETG or PA and that the windows should be printed in translucent PETG so you can see the light. [^ This is a nice guide for comparing the different filament types https://www.xometry.com/resources/3d-printing/types-of-3d-printer-filaments/.] I only had PLA+ and was going to try that because PETG prints at a higher temperature. After talking to some friends they assured me I could do PETG safely on my Ender 3 v2 without burning the tubing. So I grabbed some PETG filament. Also, please make sure to update the filament type in the extruder settings in Cura:
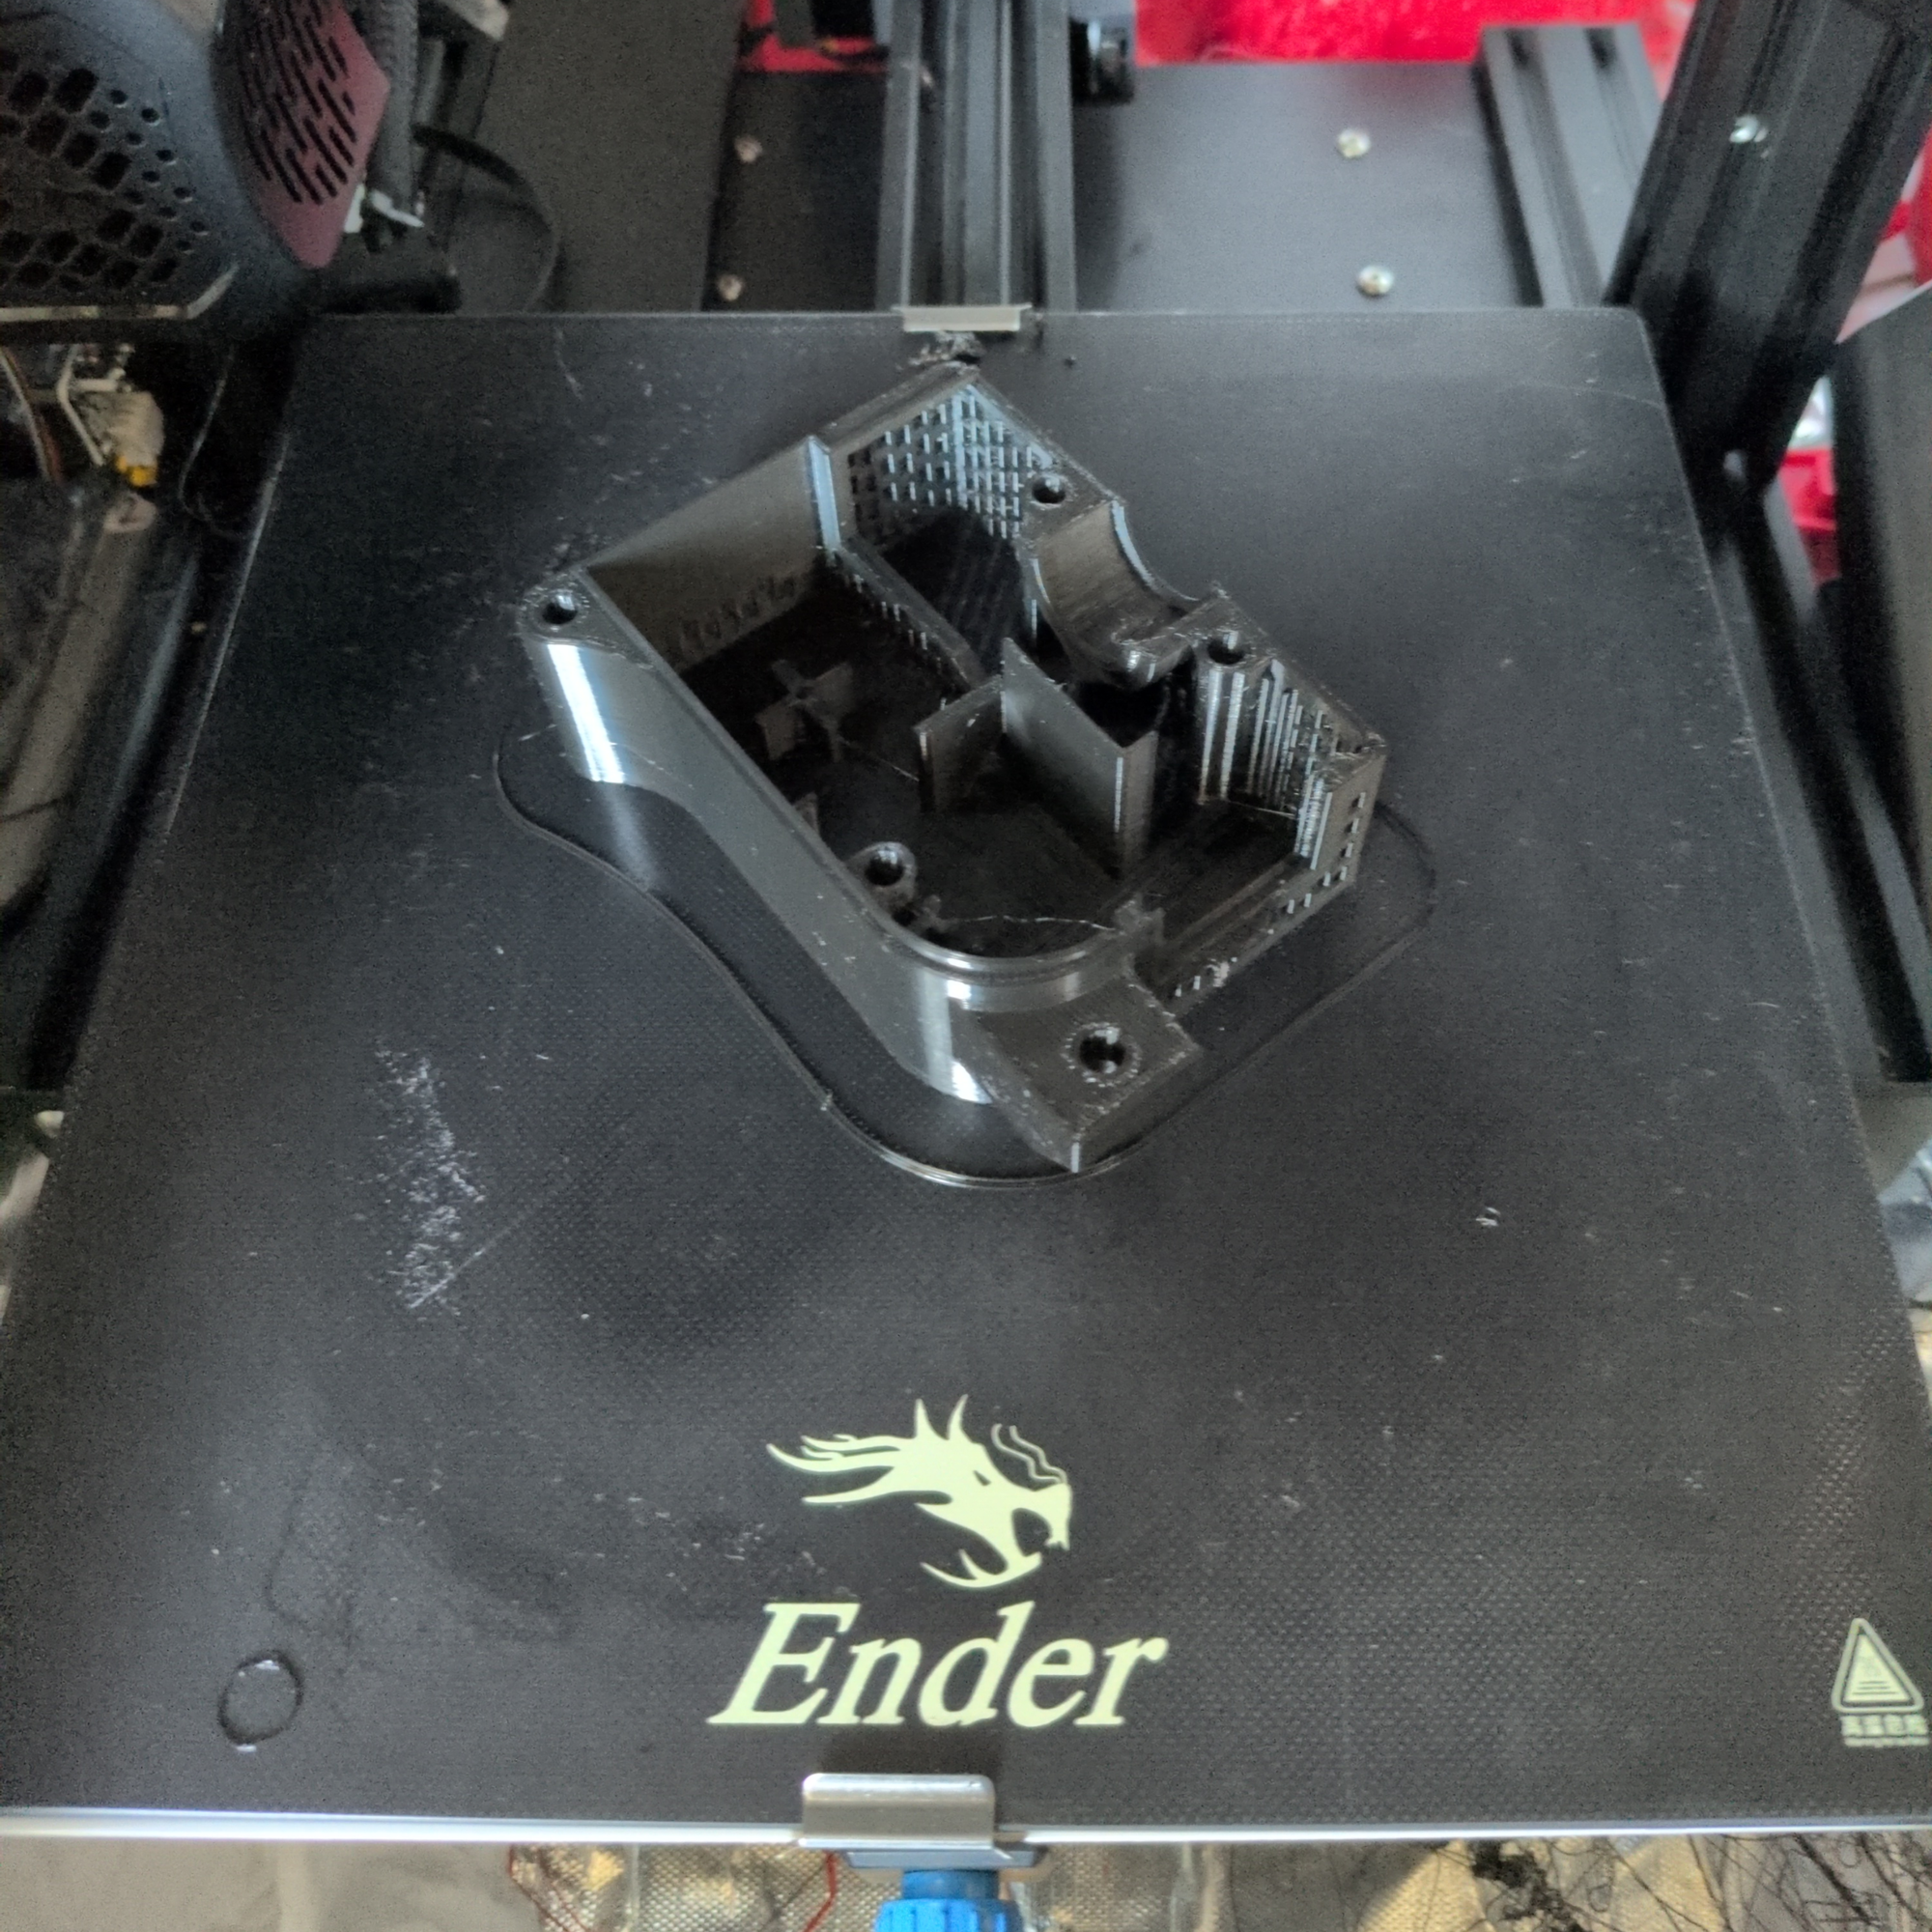
This was my first time printing in a long while, so I started with cleaning the printer bed since I had previously layered on a lot of hair spray. Then, after finally getting the calibration honed in, the left side printed without issues!
The right side gave me more trouble though. I could not get a good adhesion. That was when I remembered another part of the process I had forgotten:
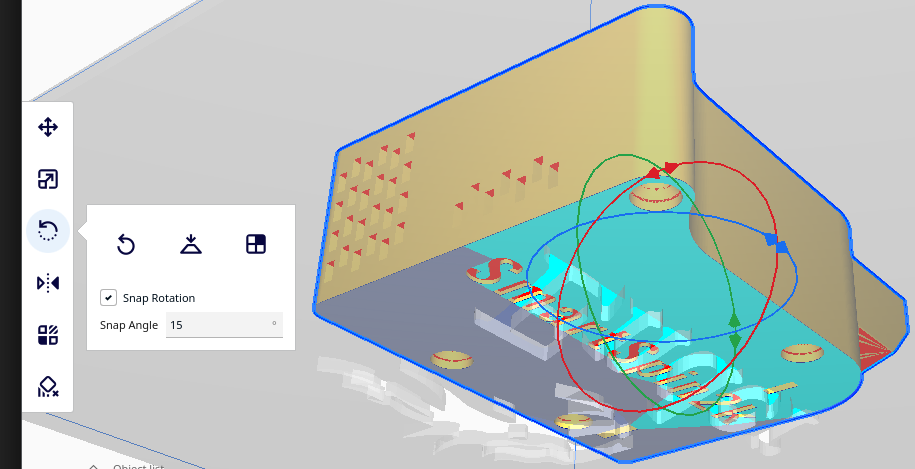
By default, Cura orients the part based on the .stl file. However, you can use the rotation tool to place the part with better contact on the printer bed:
Here are the print times for all the pieces:
| Part | Time |
|---|---|
| Left Side | 7:27 |
| Rigth Side | 7:55 |
| Window | [ ^ I forgot to check, and honestly do not have the constitution to print more parts.] |
| Arm | 0:47 |
| Spur 11T | 0:17 |
| Spur 40T | 1:00 |
| IC4 Mount | 1:54 |
| IC4 Adapter | 4:10 |
| Knob Cup | 5:52 |
Closing thoughts
I really needed to refresh my memory on 3D printing for this project. The upside is I now have a checklist I can run through in the future:
- Preparing Parts
- [ ] If needed, convert to .stl with FreeCad using Mesh View,
- [ ] Select correct material type for extruder.
- [ ] Rotate part for better contact with bed.
- Preparing Printer
- [ ] If needed, clean bed.
- [ ] Spray bed with hairspray.
- [ ] Make sure printer is fully heated to the correct temperature for the material type.
- [ ] Tram bed.
- [ ] Build bed mesh.
- [ ] Home z-probe.
Also, there are upgrades I could do to my printer, but I'm hesitant to do many more considering how old the platform is. The CR Touch seemed like a pretty good cost / benefit ratio. However, if I dump more money into more upgrades, I start to approach the price of a new printer. There was a time where starting with a cheaper printer and upgrading was the way to go, but I think printers have been commoditized enough that is no longer the case. A modern printer, in the same price range of when I bought my Ender 3 v2, would probably print 2 to 4 times faster. There are also whole bunch of functional improvements I'd get.
At the same time I'd like to avoid creating a lot of waste. I think for now my main consideration is how much I will print in the future. After all, there's been a multi-year gap between when I got the printer and I'm using it now.
Also, speaking of waste and considering all the ruined builds I had in the beginning of this project, I think I want to set up Octoprint next. You can build one using a RPi, thought octo4a lets you reuse an old Android phone!
Member discussion